

|
Total posts: 6909
Last post: Apr 13, 2024 Member since:Feb 26, 1999
|
Cars in Garage: 0
Photos: 0 WorkBench Posts: 0 |
|
before you go make a replacement, try reflaring the leaky joint.
|
|
Total posts: 1007
Last post: Jul 19, 2022 Member since:Jul 24, 2014
|
Cars in Garage: 0
Photos: 0 WorkBench Posts: 0 |
Most trouble with flaring comes from the tube end not being square and true to the tool. After cutting the tube with a wheel tubing cutter, I use a scutch bright wheel on a grinder to remove all flashing and burs from the tube end. From there make sure the tube is held square in the flair tool, and at the Correct height. From there it’s just practice. If these are double flairs all this is even more critical. Without a scotch bright wheel, mount to tube in the holder an inch or so up and use a good sharp fine file to prep the tube end.
|
|
Total posts: 4134
Last post: Oct 13, 2020 Member since:Oct 8, 2011
|
Cars in Garage: 0
Photos: 0 WorkBench Posts: 0 |
|
I have a couple of sets of the tubing removed over the years. I have planned on making up a couple of sets using stainless.
The best bender at the local hose shop and I planned to get together after work and knock them out. He has been promoted
to outside sales and no longer feels he can offer me access to the shop. The have the best benders and tools for the job. I have
four sets of flaring tools from dime store to Snap On and East Wood.
I have a drawer of the cone seals which are soft cooper and fit the taper between male and female. Mine are in brake tubing
size. Ended up remaking the tubes, who wants an issue with brakes on a race car? Steve (CTR)
PS You can make new flares and attach to tubes with compression fittings placed in out of the way location.
|
|
Total posts: 256
Last post: Aug 26, 2023 Member since:Nov 26, 2017
|
Cars in Garage: 0
Photos: 0 WorkBench Posts: 0 |
In anticipation of your answer I had already ordered a set of “used” connectors.
i will be testing them soon.
If this fails then I may have to start over with bending new pipe and making new flares.
Does anyone have experience with any of the following :
Koul Tools - Fitting Fixer
Koul Tools - Flare Lapping Tool
Earl’s Performance Conical Seals
i will be testing them soon.
If this fails then I may have to start over with bending new pipe and making new flares.
Does anyone have experience with any of the following :
Koul Tools - Fitting Fixer
Koul Tools - Flare Lapping Tool
Earl’s Performance Conical Seals
Roger Williams
1966 Austin Cooper S
LHD, WET, Personal Export
1966 Austin Cooper S
LHD, WET, Personal Export
|
|
Total posts: 2100
Last post: Oct 22, 2023 Member since:May 1, 2007
|
Cars in Garage: 1
Photos: 220 WorkBench Posts: 0 |
|
Quote:
I filled the grease gun with liquid and pumped each side to 250 psi.
One side did not leak at all.
Unfortunately the second side did leak from the brass flare fittings at both ends..
possible reasons for failure. :
- flare is bad
- connector is bad
what options do I have to correct this type of leak?
One side did not leak at all.
Unfortunately the second side did leak from the brass flare fittings at both ends..
possible reasons for failure. :
- flare is bad
- connector is bad
what options do I have to correct this type of leak?
2. replace the connectors.
|
|
Total posts: 256
Last post: Aug 26, 2023 Member since:Nov 26, 2017
|
Cars in Garage: 0
Photos: 0 WorkBench Posts: 0 |
Image Gallery
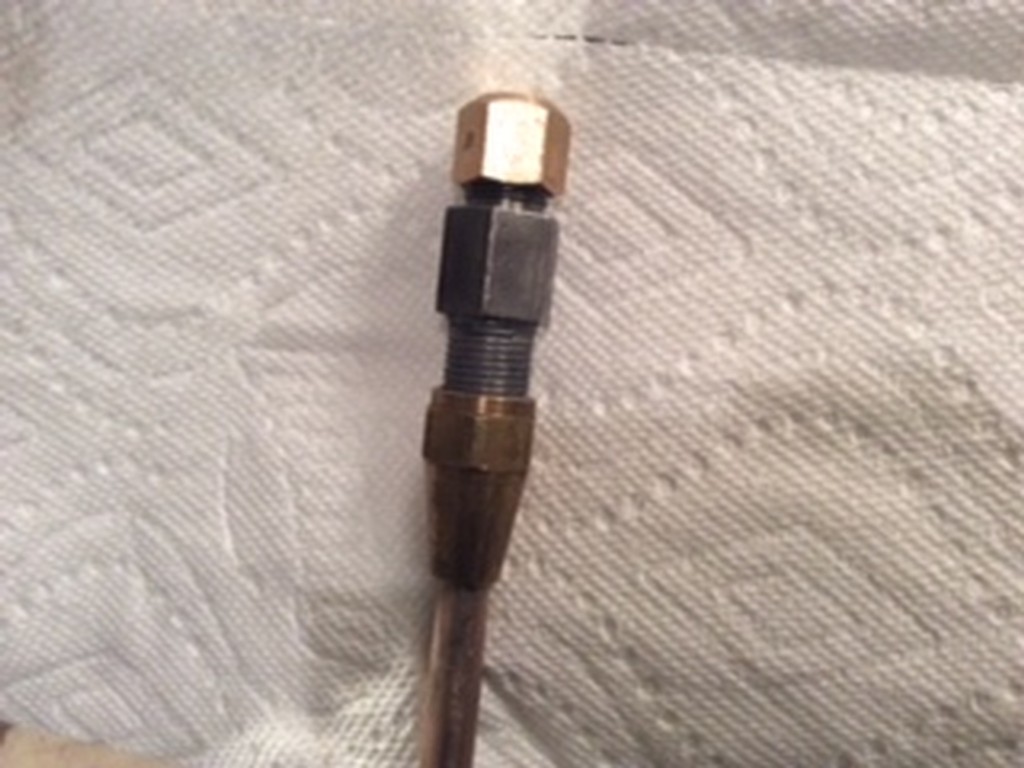
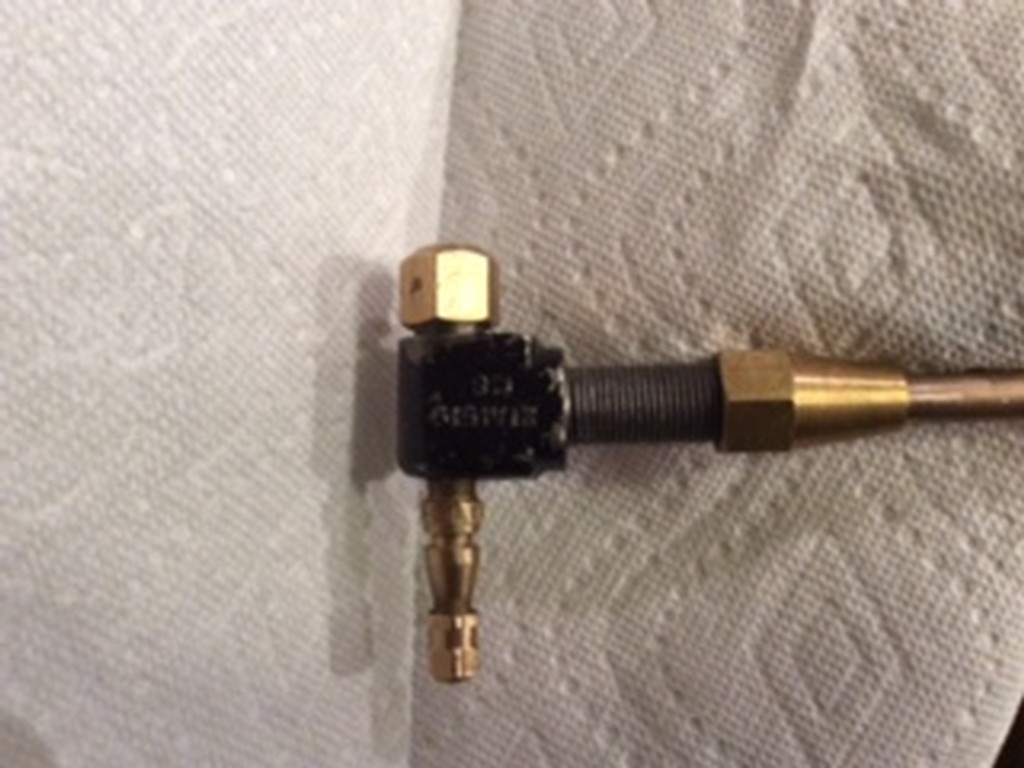
I removed the hydro connectors from the rear subframe and the firewall and attached to the newly formed hydro pipes.
See the attached pictures.
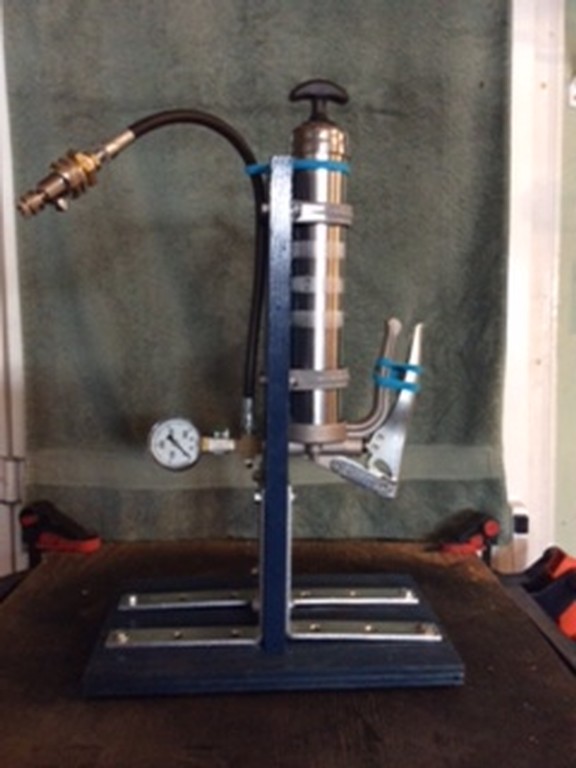
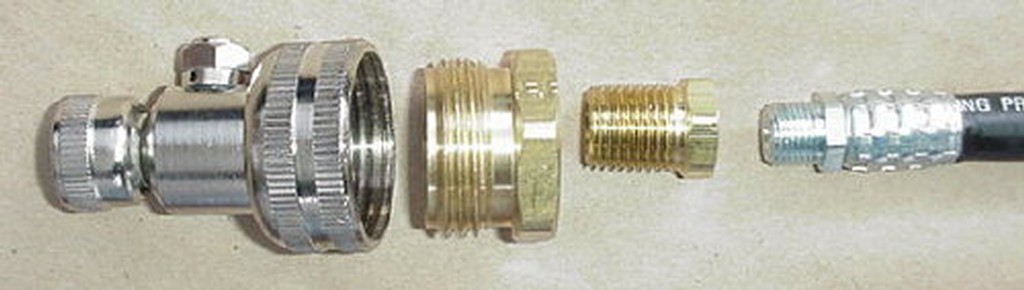
I then created a hydrolastic pump fashioned from a grease gun which I attached to a stand for ease of use. I followed the instructions found on the Austin America site (//www.austinamericausa.com/) under Technical Advice.
The key components are the Tractor Tire fitting from NAPA (#90-234) and the brass fittings that adapted from the garden hose threads on the Tractor fill valve to the 1/8th inch piupe threads on the grease gun flex hose.
Similar contraptions are available on this and other mini forums as well.
Now for the testing.
I filled the grease gun with liquid and pumped each side to 250 psi.
One side did not leak at all.
Unfortunately the second side did leak from the brass flare fittings at both ends..
possible reasons for failure. :
- flare is bad
- connector is bad
what options do I have to correct this type of leak?
Roger Williams
1966 Austin Cooper S
LHD, WET, Personal Export
1966 Austin Cooper S
LHD, WET, Personal Export
|
|
Total posts: 256
Last post: Aug 26, 2023 Member since:Nov 26, 2017
|
Cars in Garage: 0
Photos: 0 WorkBench Posts: 0 |
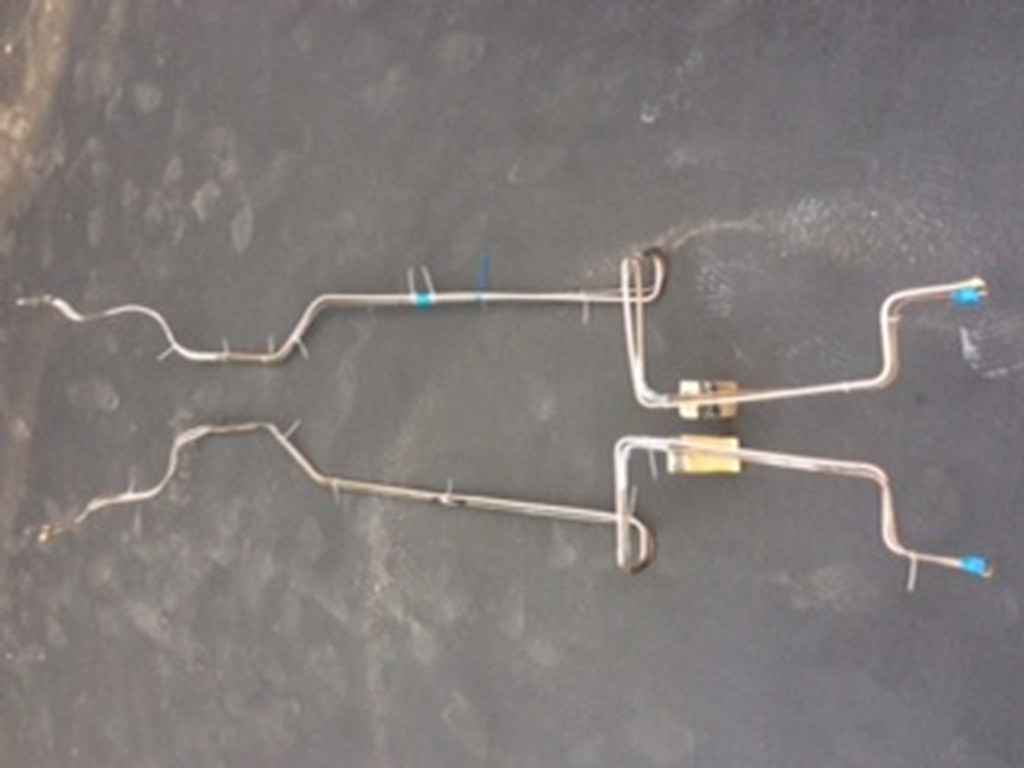 Well I have finally formed the hydro pipes.
I did have a little help from my MG car club. the extra sets of hands/heads sure did help with the bending tool and holding the tubing.
As you can see I went with Cooper/Nickel pipes and was able to use the existing pipes as a pattern.
I cut a 12' piece of pipe and started from the middle and worked my way to the front and then worked my way to the back.
this was much easier than my original attempt when I start from the front!
I borrowed a flaring kit from a local auto store. Making the flares seemed to be fairly easy.
I purchased new brass flare fittings from NAPA. On my first attempt I forgot to put the fitting on! Luckily I had sufficient length to recover from this mistake.
I did a dry fit to check the bend on the firewall and did need to re-bend slightly.
Not able to dry fit the rear since the subframe is not on. Since I used the existing pipes as a pattern I hope they fit properly.
Roger Williams
1966 Austin Cooper S
LHD, WET, Personal Export
1966 Austin Cooper S
LHD, WET, Personal Export
|
|
Total posts: 8382
Last post: Jan 13, 2022 Member since:Feb 7, 2006
|
Cars in Garage: 0
Photos: 0 WorkBench Posts: 0 |
|
Quote:
Originally Posted by RogerOtto
Thanks for the feedback.
I do have 2 pipe benders from Eastwood.
just need to get the hang of how to use.
one appears to be simple and straightforward but the other one is more complicated.
i have trouble positioning the bender on the pipe the proper way.
hopfully by starting from the middle to the front this will be easier to visualize how to bend the pipe.
Also i have seen long strong springs that fit over tubing so you can bend the tubing without kinking the it, of course depending on the ID of the spring this needs to be done before flaring the ends.
If in doubt, flat out. Colin Mc Rae MBE 1968-2007.
Give a car more power and it goes faster on the straights,
make a car lighter and it's faster everywhere. Colin Chapman.
|
|
Total posts: 256
Last post: Aug 26, 2023 Member since:Nov 26, 2017
|
Cars in Garage: 0
Photos: 0 WorkBench Posts: 0 |
Thanks for the feedback.
I do have 2 pipe benders from Eastwood.
just need to get the hang of how to use.
one appears to be simple and straightforward but the other one is more complicated.
i have trouble positioning the bender on the pipe the proper way.
hopfully by starting from the middle to the front this will be easier to visualize how to bend the pipe.
I do have 2 pipe benders from Eastwood.
just need to get the hang of how to use.
one appears to be simple and straightforward but the other one is more complicated.
i have trouble positioning the bender on the pipe the proper way.
hopfully by starting from the middle to the front this will be easier to visualize how to bend the pipe.
Roger Williams
1966 Austin Cooper S
LHD, WET, Personal Export
1966 Austin Cooper S
LHD, WET, Personal Export
|
|
Total posts: 6909
Last post: Apr 13, 2024 Member since:Feb 26, 1999
|
Cars in Garage: 0
Photos: 0 WorkBench Posts: 0 |
|
Roger,
you can get a cheap tubing bender at auto parts stores. It's shaped like pliers sort of with a wheel at the end. Easy to use.
Even the real cheap ones you find in the $2 bin at autoparts stores work fine.
you can get a cheap tubing bender at auto parts stores. It's shaped like pliers sort of with a wheel at the end. Easy to use.
Even the real cheap ones you find in the $2 bin at autoparts stores work fine.
|
|
Total posts: 256
Last post: Aug 26, 2023 Member since:Nov 26, 2017
|
Cars in Garage: 0
Photos: 0 WorkBench Posts: 0 |
Well I have given up working with the steel/zinc pipe and have moved onto copper/nickel.
i broke the flaring tool as well and had to replace a hardened steel shaft.
I started from the front but find it too difficult to make the bends. I believe this may be due to the length of pipe I have to bend (~10 ft). I am going to start over and work from the middle to the front. Here I only need to deal with about 2ft of pipe to bend.
I will report back how this goes.
Roger Williams
1966 Austin Cooper S
LHD, WET, Personal Export
1966 Austin Cooper S
LHD, WET, Personal Export
|
|
Total posts: 256
Last post: Aug 26, 2023 Member since:Nov 26, 2017
|
Cars in Garage: 0
Photos: 0 WorkBench Posts: 0 |
Thanks to all for comments and encouragement.
Currently at Little League World Series!
i will try again later this week.
if unsuccessful I will go with conifer (copper-nickel) and report my progress.
Currently at Little League World Series!
i will try again later this week.
if unsuccessful I will go with conifer (copper-nickel) and report my progress.
Roger Williams
1966 Austin Cooper S
LHD, WET, Personal Export
1966 Austin Cooper S
LHD, WET, Personal Export
|
|
Total posts: 3919
Last post: Oct 29, 2019 Member since:Oct 4, 2013
|
Cars in Garage: 0
Photos: 0 WorkBench Posts: 0 |
roger.. I had some hydro pipes made for friends recently cost me about $66 per pipe out of copper.. I will need the old ones to make a pattern.. I think Deb and Rich franks. have some hydro bags if needed.. in NJ.. later bc
|
|
Total posts: 1649
Last post: Jun 22, 2022 Member since:Apr 30, 2009
|
Cars in Garage: 0
Photos: 0 WorkBench Posts: 0 |
|
I Believe we had this conversation before.....
I previously installed a Set of "Pre Bent" Hydro hoses to a car.. They arrived 95% accurate... With the subframes out of the car = they snapped up into place into the body mount tabs and only needed a SLIGHT persuasion to follow the original contours.
BOTH Hydro lines were installed in under 2 hours with Both ends Flared and new fittings already in place.
Keep that in mind now with your attempts = Ups and downs.. Ins and outs of bending your own. fitting back to forward then flaring and fitting... Lots of Time invested..
If staying with bending your own . make sure the pipe you're using is Cunfer.. Copper mix alloy = MUCH easier to bend than steel.
|
|
Total posts: 2100
Last post: Oct 22, 2023 Member since:May 1, 2007
|
Cars in Garage: 1
Photos: 220 WorkBench Posts: 0 |
|
You can also get the "easy bend" ones. I think you can do most of the bends by hand without a bender with those.
|
|
Total posts: 256
Last post: Aug 26, 2023 Member since:Nov 26, 2017
|
Cars in Garage: 0
Photos: 0 WorkBench Posts: 0 |
I did consider the flexible hoses.
they would be the easiest and cheapest!
however ... I am stuck on trying to save the originality for now.
Prior to this post I did attempt a few bends. I started at the front since I could
attach the pipe end to the stationary fixture under the hood. I got close but it is
not quite right! Seems the learning curve on using the pipe bender may lead me back
to consider the flexible hoses!
well, maybe I will cut this “test” section off and try again. If I fail again I will need to buy more pipe -
hard or flexible.
Roger Williams
1966 Austin Cooper S
LHD, WET, Personal Export
1966 Austin Cooper S
LHD, WET, Personal Export
|
|
Total posts: 2100
Last post: Oct 22, 2023 Member since:May 1, 2007
|
Cars in Garage: 1
Photos: 220 WorkBench Posts: 0 |
|
Or use the flexible ones.
|
|
Total posts: 9241
Last post: Aug 17, 2023 Member since:Jun 5, 2000
|
Cars in Garage: 0
Photos: 0 WorkBench Posts: 0 |
|
I have never worked on a wet car so the following is just a general suggestion.
When I work with forming new pipes for anything I take pieces of stiff 14 AWG wire and bend them to make a template. Then I copy the shape of the wire on the tubing I am using.
When I work with forming new pipes for anything I take pieces of stiff 14 AWG wire and bend them to make a template. Then I copy the shape of the wire on the tubing I am using.
Doug L.
|
|
Total posts: 1723
Last post: Oct 20, 2020 Member since:Jun 18, 1999
|
Cars in Garage: 0
Photos: 0 WorkBench Posts: 0 |
|
I would start at the rear. You have a lot of bends back there.
|
|
Total posts: 256
Last post: Aug 26, 2023 Member since:Nov 26, 2017
|
Cars in Garage: 0
Photos: 0 WorkBench Posts: 0 |
66 Mk1 S
I have old pipes but both broke where they meet the rear subframe.
I could use as pattern.
what is recommended/easiest way to form new pipes?
a) start at front and work toward rear
b) start in middle and work toward front, then work toward rear
c) other
I have old pipes but both broke where they meet the rear subframe.
I could use as pattern.
what is recommended/easiest way to form new pipes?
a) start at front and work toward rear
b) start in middle and work toward front, then work toward rear
c) other
Roger Williams
1966 Austin Cooper S
LHD, WET, Personal Export
1966 Austin Cooper S
LHD, WET, Personal Export


